There are certain smells that transport you right back to childhood, and for me, the scent of buttermilk biscuits baking is one of them. It reminds me of slow Sunday mornings in my grandmother’s kitchen, with flour dusting every surface and the comforting warmth of the oven filling the air. She never used a recipe card; it was all touch and feel. She insisted that the best things in life were simple, and her homemade scratch buttermilk biscuits were proof. This recipe is the closest I’ve ever come to hers—a simple buttermilk biscuit recipe that requires just three basic ingredients but delivers unbelievably fluffy, tender results every single time.
The Magic Trio: What You’ll Need for Perfect Biscuits
You might look at the short ingredient list and feel a little skeptical. I get it. But the magic of this 3-ingredient buttermilk biscuits recipe lies in the synergy of three very specific, very important components. There’s no room for error, but luckily, it’s hard to go wrong.
- Self-Rising Flour: This is the ultimate shortcut. It already contains a leavening agent (baking powder) and salt, which saves you two ingredients right there. If you don’t have any, don’t worry! You can make your own by whisking 2 cups of all-purpose flour with 1 tablespoon of baking powder and 1/2 teaspoon of fine salt.
- Frozen Butter: This is non-negotiable. I use one stick (a half-cup) of salted butter, frozen solid for at least an hour. The frozen state is crucial for creating those flaky layers we all crave. You can use unsalted, but you might want to add a tiny pinch of salt to your flour mixture.
- Cold Buttermilk: Full-fat, ice-cold buttermilk is what gives these biscuits their signature tang and tender crumb. The acid in the buttermilk reacts with the leavening in the flour to create an extra lift. Keep it in the fridge right up until the moment you need it.
The Secret to Fluffy Layers? It’s All About The Chill
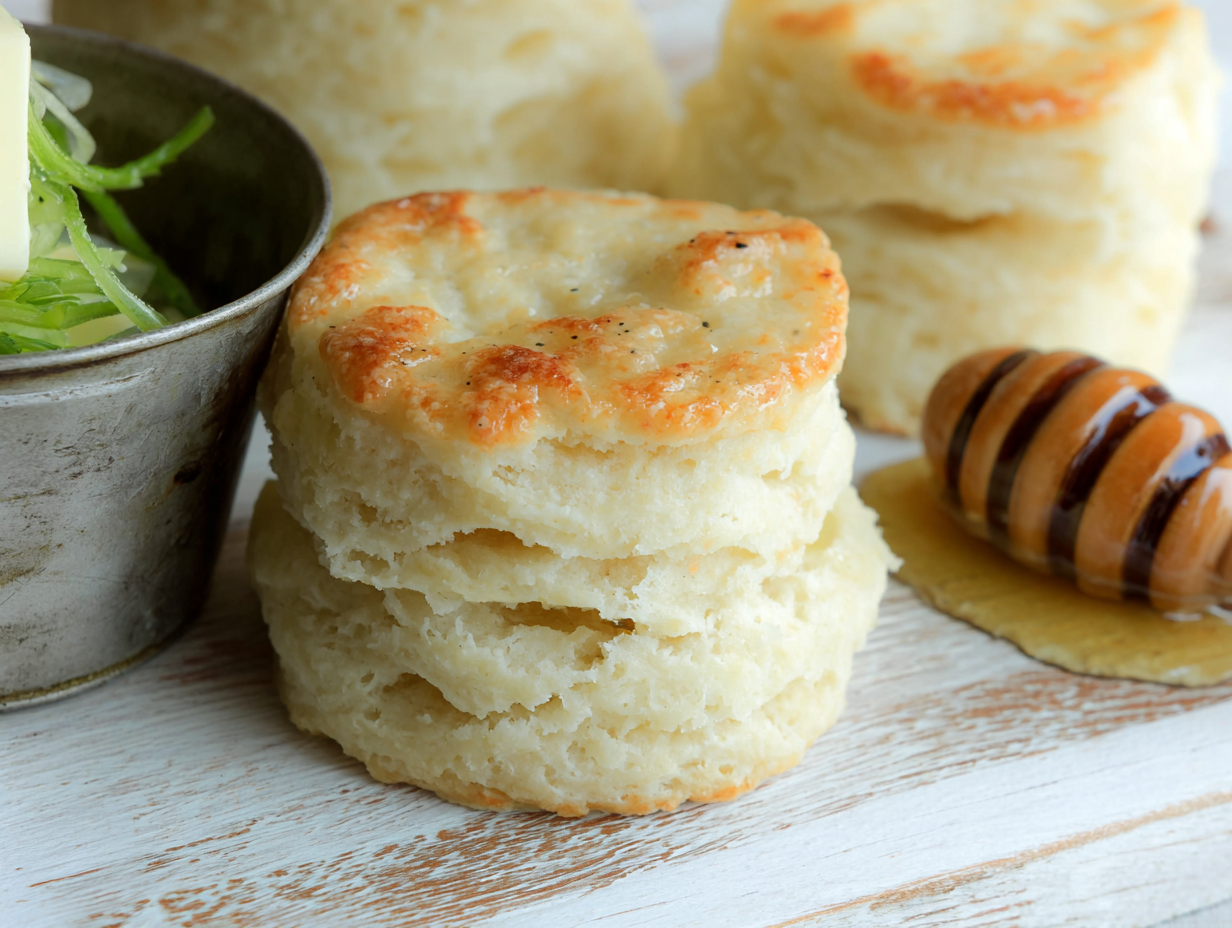
The single most important rule of biscuit making is to keep your ingredients as cold as possible. This isn’t just an old wives’ tale; it’s science. When those little frozen bits of butter are suspended in the dough and hit the high heat of the oven, they melt rapidly. As they melt, they release steam, which pushes the dough upwards, creating pockets of air. Those pockets are what we see as light, fluffy, distinct layers.
This is why we grate the butter while it’s still frozen. Grating creates small, uniform pieces that distribute evenly throughout the flour without melting from the heat of your hands. It’s also why we work quickly and handle the dough as little as possible. The more you knead and fuss with it, the more the butter warms and softens, and the denser and flatter your biscuits will be. So, embrace the chill and work fast!
How to Make 3-Ingredient Buttermilk Biscuits Step-by-Step
Ingredients
- 2 cups self-rising flour
- 1/2 cup frozen salted butter (1 stick), plus more for brushing
- 1 cup cold buttermilk
Instructions
- Prep Your Oven and Pan: First things first, get your oven preheating to a blazing 450°F. This high heat is essential for getting that initial puff of steam from the butter. Line a baking sheet with parchment paper.
- Grate the Butter: In a large mixing bowl, measure out your self-rising flour. Take your butter directly from the freezer and, using the large holes of a box grater, grate the entire stick right into the flour. Toss the butter shreds with the flour as you go to prevent clumping.
- Cut the Butter In: Using a pastry blender or just your fingertips, quickly cut the butter into the flour. You’re looking for a coarse, crumbly texture, like rough sand with some pea-sized pieces of butter still visible. Work quickly to avoid melting the butter.
- Add the Buttermilk: Pour the cold buttermilk in all at once. Use a rubber spatula to mix until a shaggy, slightly sticky dough just begins to form. Do not overmix! A few dry patches are perfectly fine.
- Turn and Fold: Lightly flour a clean work surface and turn the dough out. Gently bring it together into a rough ball. Now, for the layers: pat the dough down slightly and fold it over on itself like a letter, three to four times. This lamination process is what creates those beautiful, pull-apart layers.
- Pat and Cut: After the last fold, gently pat the dough out into a rectangle about 1-inch thick. Do not use a rolling pin, as it can compress the dough. Using a 3-inch biscuit cutter, press straight down to cut out your biscuits. Do not twist the cutter, as this can seal the edges and prevent them from rising.
- Arrange and Bake: Place the cut biscuits on your prepared baking sheet so their sides are just touching. This helps them support each other as they bake, encouraging them to rise upwards instead of outwards. You can gently re-pat the scraps to cut out another biscuit or two.
- Bake to Golden Perfection: Bake for 12-14 minutes, or until the tops are golden brown. As soon as they come out of the oven, brush the tops generously with melted butter. Let it soak in for a minute, then give them a second brush for good measure.
Common Biscuit Blunders and How to Avoid Them
Even the simplest recipes can go wrong. If your biscuits didn’t turn out quite right, one of these common culprits is likely to blame.
- The Problem: My biscuits are hard and tough.
The Cause: You overworked the dough. When you work with flour, you develop gluten. A little gluten provides structure, but too much makes baked goods tough.
The Fix: Handle the dough as little as possible. Mix only until it just comes together, and when you fold, do it gently and quickly. - The Problem: My biscuits didn’t rise and are flat.
The Cause: Your ingredients got too warm, or you twisted the biscuit cutter.
The Fix: Keep that butter frozen and the buttermilk cold! Work fast. And when you cut your biscuits, press straight down and pull straight up. Twisting the cutter seals the edges, preventing a proper rise. - The Problem: My biscuits are dry.
The Cause: You added too much flour or baked them too long.
The Fix: Your dough should be slightly sticky and shaggy, not a perfectly smooth, dry ball. Resist the urge to add too much flour when kneading. Also, keep an eye on them in the oven; they’re done when they’re golden brown on top.
Chef’s Secret: A Few Fun Twists on a Classic
While these classic buttermilk biscuits are perfect as they are, they also serve as a wonderful canvas for other flavors. Here are a few simple variations to try:
- Cheddar and Chive: Add 1/2 cup of shredded sharp cheddar cheese and 2 tablespoons of freshly chopped chives to the flour mixture along with the grated butter.
- Rosemary and Black Pepper: Mix in 1 tablespoon of finely chopped fresh rosemary and 1/2 teaspoon of coarsely ground black pepper. This version is incredible with soups and stews.
- Sweet Cinnamon Sugar Finish: My personal favorite twist for breakfast! Just before baking, brush the tops of the biscuits with melted butter and sprinkle generously with a mixture of cinnamon and sugar.
3-Ingredient Buttermilk Biscuits
Equipment
- Baking sheet
- Parchment paper
- Box grater
- pastry blender
- rubber spatula
- Biscuit cutter
Ingredients
Ingredients
- 2 cups self-rising flour
- 1/2 cup frozen salted butter (1 stick), plus more for brushing
- 1 cup cold buttermilk
Instructions
Instructions
- Prep Your Oven and Pan: First things first, get your oven preheating to a blazing 450°F. This high heat is essential for getting that initial puff of steam from the butter. Line a baking sheet with parchment paper.
- Grate the Butter: In a large mixing bowl, measure out your self-rising flour. Take your butter directly from the freezer and, using the large holes of a box grater, grate the entire stick right into the flour. Toss the butter shreds with the flour as you go to prevent clumping.
- Cut the Butter In: Using a pastry blender or just your fingertips, quickly cut the butter into the flour. You’re looking for a coarse, crumbly texture, like rough sand with some pea-sized pieces of butter still visible. Work quickly to avoid melting the butter.
- Add the Buttermilk: Pour the cold buttermilk in all at once. Use a rubber spatula to mix until a shaggy, slightly sticky dough just begins to form. Do not overmix! A few dry patches are perfectly fine.
- Turn and Fold: Lightly flour a clean work surface and turn the dough out. Gently bring it together into a rough ball. Now, for the layers: pat the dough down slightly and fold it over on itself like a letter, three to four times. This lamination process is what creates those beautiful, pull-apart layers.
- Pat and Cut: After the last fold, gently pat the dough out into a rectangle about 1-inch thick. Do not use a rolling pin, as it can compress the dough. Using a 3-inch biscuit cutter, press straight down to cut out your biscuits. Do not twist the cutter, as this can seal the edges and prevent them from rising.
- Arrange and Bake: Place the cut biscuits on your prepared baking sheet so their sides are just touching. This helps them support each other as they bake, encouraging them to rise upwards instead of outwards. You can gently re-pat the scraps to cut out another biscuit or two.
- Bake to Golden Perfection: Bake for 12-14 minutes, or until the tops are golden brown. As soon as they come out of the oven, brush the tops generously with melted butter. Let it soak in for a minute, then give them a second brush for good measure.